Setting Up The Mirakl Connector
Step 1: Create your account on the Gepard platform
To start using the Gepard-Mirakl connector, you will have to:
- set up your account (tenant) on the Gepard platform
- activate you seller account on Mirakl
The steps below describe the process of using the Gepard-Mirakl connector after both accounts have been created.
* For more details and arrangement, contact us at https://gepard.io/contact-us.
Step 2: Create your Mirakl connector profile
After you have logged in to your Gepard account, in the left-side menu go to Platform → Select application → Mirakl and click on Switch To Application.
In Available Connectors find Mirakl API and click on the ➕ Create New Profile icon.

On the Mirakl authorization page, you will be asked to confirm accessing your shop on the Mirakl platform:
(a) You logged into your Mirakl account earlier
If you have more than one shop on Mirakl (e.g. in different currencies), select the required shop and click on Confirm to access the Mirakl authorization page.

On the authorization page, click on Confirm to accept the authorization scope and proceed with setting up the connector profile.

(b) You have not logged into your Mirakl account earlier
You will be redirected to the environment to log in with your Mirakl credentials, thereafter follow the steps described in para. (a) above.
Step 3: Activate your Mirakl connector profile
Thereafter you will be returned to the Gepard platform, with your created and available for activating connector profile.
To activate the profile, check the box Active and click on Save.
Otherwise, by clicking Back – you will be returned to the Available Connectors page.

Step 4: Import the Mirakl taxonomy configuration
Front Office Taxonomy Import
After your Mirakl profile has been activated in the platform Back Office, a taxonomy import configuration for importing the Mirakl content taxonomy will be created in the Gepard Front Office.
All it takes to run the import is to click on the tab of the required import configuration.
The result will appear in the list of Recent Imports, where the user can download the import log and the feed file by clicking on the applicable icons.
Back Office Taxonomy Import
Optionally, the taxonomy can be imported via the platform’s Back Office:
After your Mirakl profile has been activated, the Gepard platform will automatically create a taxonomy import configuration for importing the Mirakl content taxonomy into the Gepard platform. The configuration will be on the Import tab.

To run the taxonomy import, click on ▶️ Execute Import icon.
Upon completion, the Status of the import configuration will change from Ready for Import to Success. To update the Mirakl content taxonomy for the Gepard platform, simply rerun the taxonomy import by clicking on Execute Import icon of the relevant import configuration.
Thereafter, the taxonomy entities will be available in Data Models → External Data tab.

Step 5: Import the source taxonomy and content
Front Office Source Taxonomy And Content Import
Once the user sets up in the Back Office a configuration for importing the source taxonomy and content (see General process flow for table-based imports below), the import can be run using the Front Office:
On the page Imports, select the required saved import configuration and click on it. 
Back Office: Setting Up Table-Based Imports
To start importing your taxonomy and content, go to the Import tab, in the Import Configurations window click on Create Import Configuration, and in the drop-down select your import type.

As an example, consider setting up a Table-Based import.
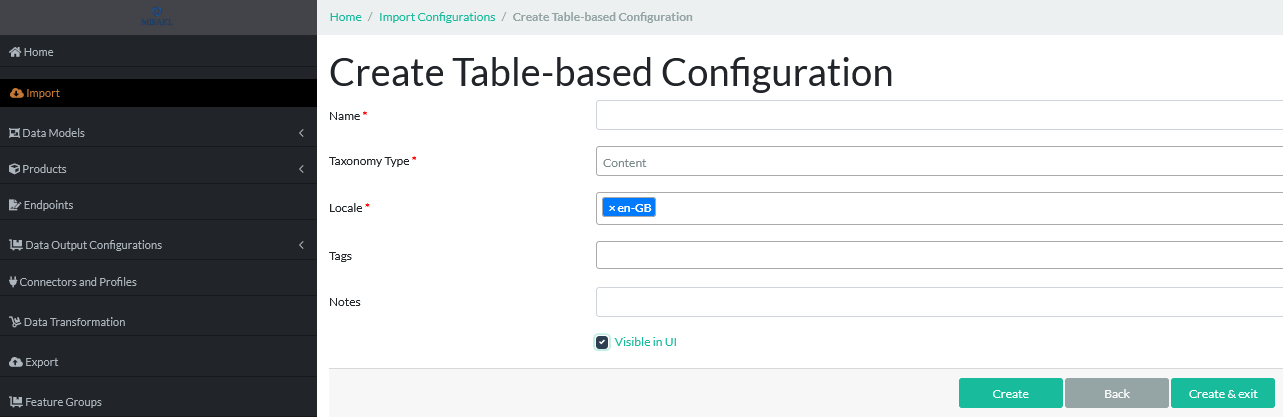
On Create Table-Based Configuration page, fill in the required fields:
- Name: assign a name to your configuration
- Taxonomy type: from the drop-down, select the required type, e.g. Content
- Locale: from the drop-down, select the applicable locale (language) of your content import
To confirm and proceed click on Create.
On the next page Update Table-Based Configuration, after you click on Add File, Add Source window will appear for adding a source file.

In the drop-down of File Includes, select Product Content & Data Model.
Click on Browse and select your file for uploading. Click on Save.

Your taxonomy and content file will appear in the File list.
- Click on Define Taxonomy to bind your taxonomy to that of the platform.
- Use the Configuration menu to match your taxonomy to the system taxonomy.

The fields marked with an asterisk are mandatory.
Click on Save upon completion.

Your content import configuration will appear in Import Configurations.
Run the import by clicking on ▶️ Execute Import icon.
Step 5: Map the content and external (Mirakl) taxonomies
The taxonomies of your content provider and Mirakl may differ. To have your products correctly displayed in your store, the taxonomies should be mapped to each other.
The taxonomy mapping menu is in Data Models → External Data tab, where the user can map languages, brands, categories, features, feature values, and units to match your content provider’s taxonomy and the Mirakl taxonomy.

The mapping can be done by either the user or the Gepard taxonomy team, subject to an agreement. There is a guide on mapping available to the user.
Step 6: Send your product content to Mirakl
Similar to the import configuration, upon your Mirakl profile activation, the Gepard platform will automatically create an export configuration for exporting the content feeds to your Mirakl store.
The user can export the product content after the taxonomies have been mapped in the Back Office.
Front Office Content Export
Go to the Export tab and click on the required Saved Export Configuration.
Your product content will be exported to Mirakl.

Back Office Content Export
The export configuration menu is available through the Endpoint tab in the menu:

After the taxonomies have been mapped, run your content export to Mirakl by clicking on ▶️ Run Pipeline Execution button in the Endpoints tab:

Find the exported products on your Mirakl shop:

Step 7: Check your exported product content for errors
Front Office
After the export has been run, the user can download the export report and output file. To download, click on the icon ⬇️ Download Report or ? Download Feed, as applies:

Back Office
The user can check the status of content exports at the Export tab.
The exported files can be downloaded in XML format by clicking on the ? Download Feed button.
To see a CSV export report, download it by clicking on the ⬇️ Download Report button.

We hope this guide was easy-to-use and helpful for you! ? In case you have any questions, please reach out to our dedicated Support Team at support@gepard.io.